
Hello! Thanks for taking the time to learn a bit more about my new game. If you only have a minute, here’s a quick video that walks you through the basics of the game:
And here’s a product sheet giving a quick overview of the specs:

Otherwise, here I go into a bit more depth about how to play, and how I made it.
How to play
The Hills
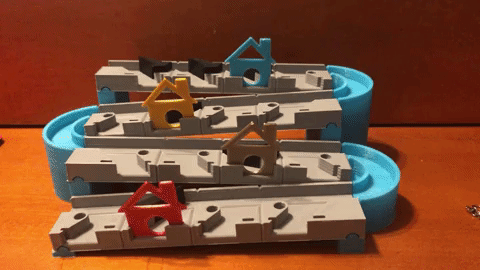
The Hills is where the game is played. These components can be easily assembled together for play or taken apart for storage. If a marble is placed at the top of the hills, it will roll down the track all the way to the bottom.

Marbles, Houses, and Switches
Marbles are rolled down the hill, houses are placed on the hill, and switches are used to direct marbles to their matching house.

Challenge Cards
Challenge Cards each have a different puzzle printed on them. Each Challenge Card tells you where to place the houses on the hill, the order you should release the marbles in, and how many switches you’re allowed to place on the hill to get all the marbles home.
Here’s a couple of example challenge cards:

Putting it all together
Let’s say you’re challenged to solve the first example challenge card above. That means you have 4 switches and 2 redirectors to solve the puzzle, you’ll release the marbles in the order red-yellow-green-blue, and the hill will look like this:

Now the player can use both trial and error and spatial reasoning to figure out the correct placement of switchers to guide all the marbles home. After some puzzling and tinkering, they’d eventually wind up with this solve:

Let’s watch that solution in motion and see how the marbles find their way home.
And there you go, that’s how to play Rolling Hills! It’s easy to learn and hard to master, combining all the best features of past hits like Rush Hour, Turing Tumble, and Donkey Kong to create an entirely new type of game.
How I made it
Rolling Hills started when an image of a zig-zagging marble track popped into my head, and I immediately felt it had the strong potential to make a great game. I immediately tried to sketch out what I was imagining.


Once I started getting into the level planning stage of sketching, I realized very quickly I’d have to jump into 3D and play it for myself to get much further. So I whipped up a first draft model in Fusion 360, as seen rendered here:

Though this looks really close to the current prototype, there was still lots of fine tuning that needed to be done. First and foremost, the exit angle for the switch tracks was way too steep, stopping the marble in its tracks instead of bumping it off of the track. To make the switch track work better, I tweaked how deep the grooves were in the grey track, adjusted the exit angle for the switch track, and tilted the whole assembly forwards by 2 degrees. Then I had to reprint the base (now split into 2 much smaller pieces), the 4 grey track pieces, and a bunch of new switchers.
With those adjustments made, that brings us to the current prototype. Now I am able to design levels and play test with my family. Next up I’d like to design a marble release mechanism to put at the top of the hill, and print the redirector pieces in a different color to differentiate them from the switchers.
